‘Photogenic Bootcamp’: 20 Tips To Look Better In Photos, As Shared By This TikToker
Whether we like to admit it or not, pretty much everyone wants to be respected and admired by others—family members, friends, and complete strangers. We are social animals, and we crave affection and attention. In this day and age, most people make instant judgments about each other based on the information that they come across on the internet, from their online photos to their posts. However, we sometimes look awkward or scared in pictures.
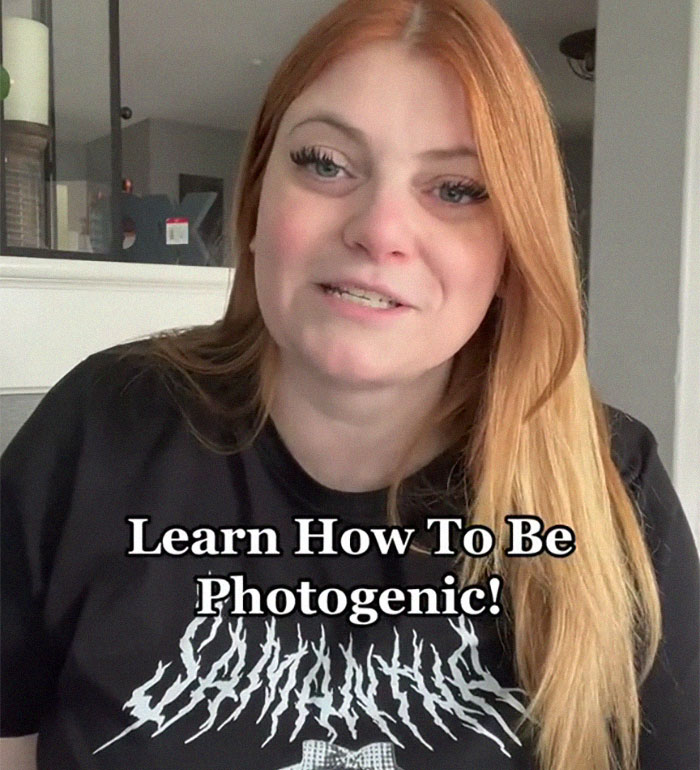
Popular posing expert Christine Buzan has some great tips and tricks that can help anyone look more confident in their photos. We’ve collected some of her best advice, as shared on her ‘Photogenic Bootcamp’ video series on TikTok. Scroll down to check them out. They might help you the next time you’re having your picture taken! Bored Panda has reached out to Christine via email and we’ll update the article as soon as we hear back from her.
More info: TikTok | Instagram | Website | Book
Posing expert Christine helps people feel more confident when having their picture taken
Image credits: lookgoodinphotos
She started up a TikTok video series called 'Photogenic Bootcamp' to share some of her best tips with the internet
@lookgoodinphotos Replying to @tryagainlater12345 DAY 20: PHOTOGENIC BOOTCAMP | Does your mouth look awkward in photos? Do you have no idea how to pose your lips for photos? Or do you just end up with a facial expression that looks strained and awkward? Today I’m going to teach you the most common reason why this happens, and an old modeling hack you can do to fix it… ⚠️THE ISSUE⚠️ It can be easy when you’re posing for photos to choose a default facial expression and stick with it through several photos. However, when you’re holding the same expression for a long period of time, your face can become strained and look tense and awkward. ✅THE SOLUTION✅ The key to looking less awkward is changing up your facial expressions in between snaps. If you have no idea what to do, try out this old modeling hack — mouth the vowels “a" “e” “i” “o” and “u” to add range to your mouth’s movement. - #p#posingyourmouthp#posingyourlipsp#posingyourfacef#facialexpressions ♬ original sound - CHRISTINE BUZAN | POSING TIPS
#1 Posing Hack For A Smaller Waist
If you want your waist to look more snatched in photos, listen up because this is my number one tip for minimizing the appearance of a larger waist in photos.
Okay, so the tip to minimizing your waist in photos is really in how you position your hips. Let me show you. This is what it looks like when I stand with my hips neutral. I'm not wearing any shapewear, so you can really see the outline of my body and everything. So what I'm going to do is I'm going to pull myself up, pretend like a string is pulling me from the top. See that kind of minimizes it already. And then from there, I'm going to push my hips backward.
Okay, so here's the before and here's the after. But here's the thing about posing. Nothing is one size fits all. So if you're naturally a more petite person, you might be served better by pulling up and tucking your hips under. So pull yourself up, tuck your hips, like scoop them under like this. That doesn't work for me because I have like a shelf belly, but if you don't, that might be your best bet. So really, you just need to experiment and find what works best for you.
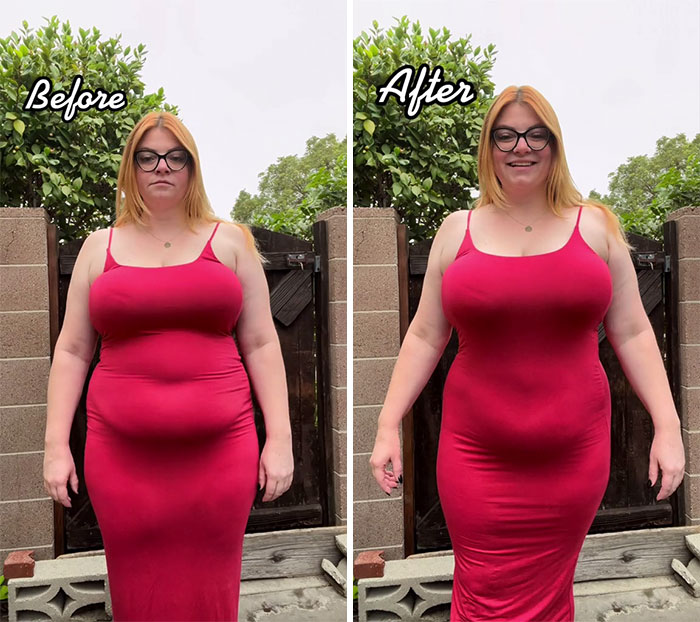
Image credits: lookgoodinphotos
Here's what some people thought of Christine's advice


#2 How To Hide A Double Chin In Photos
This is for anyone who feels self-conscious about having a double chin in photos. I'm gonna teach you my four foolproof tips for minimizing the appearance of a double chin in pictures.
Tip number one. This one is going to be the most obvious. To minimize the double chin, have your photos taken from a higher camera angle. This is what my chin looks like from a higher camera angle. There are a few things that you need to be aware of. If you wanna use a higher camera angle though, first of all, it's gonna make your forehead look really large. Second, it's going to make your head and your shoulders look way larger than the rest of your body. And third, it looks kind of dated. It kind of gives like 'your one aunt on Facebook' vibes, if you know what I mean. So to be safe, if you're going to use a higher camera angle, be sure not to go any higher than your eyebrows with your camera lens.
Tip number two, and this one is an absolute game changer. It's my personal favorite. It's called the chin on ledge. To do this tip, you're going to raise your chin, stick it forward, and pretend that it is resting on a ledge. I find this one to be the most effective when it comes to reducing the appearance of a double chin.
Tip number three is really simple. It takes minimal effort, but I think it does get really good results, and that is tilting your head to the side. For instance, here's my head natural, and I tilt it. It makes my jawline a little tauter on the side of my face.
Finally, tip number four, and that is to pose with your hands in front of your face. Like Steve Jobs.
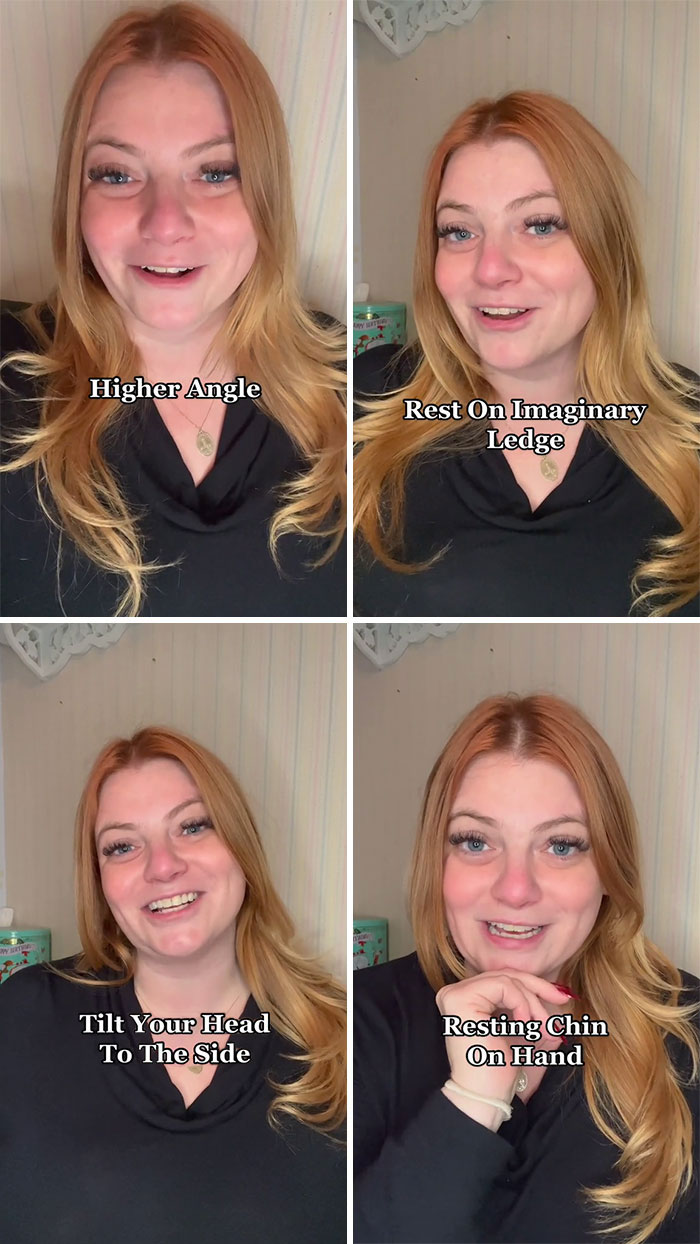
Image credits: lookgoodinphotos
Here's what some people thought of Christine's advice


#3 How To Find Your Face's Best Angle For Photos
I'm gonna teach you a super easy hack for finding your face's best angle, so you can look more photogenic.
I'm gonna teach y'all an exercise that you can do. And all you need is your phone, somebody to take your photo, and a sheet of paper.
So to do the paper exercise, you're gonna have someone else take your picture using the back camera. So not the forward-facing camera that you use to take selfies, but the other camera that's on the back of your phone that other people use to take your photo. You're then gonna make sure that whoever's taking your picture has the camera lens at about eye or eyebrow level to you, so it's not too high or not too low. You also wanna make sure that they're holding the camera straight. They're not tilting it toward you or away from you because that distorts the way that your face looks.
And after you have the camera set up, you're going to grab your piece of paper and you're going to cover one side of your face and have them take your photo like this. Then you're gonna repeat this process by covering the other side of your face and have them take your photo. From there, you can look at the photos objectively and you can decide which side of your face you like the most.
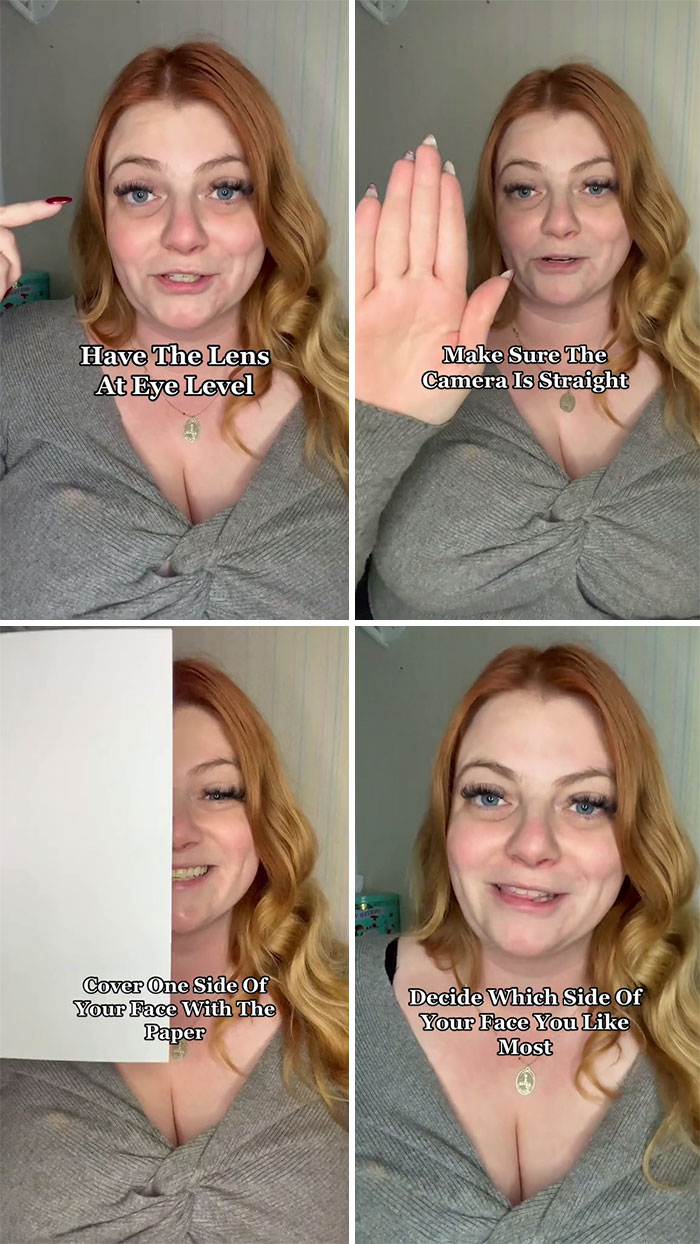
Image credits: lookgoodinphotos
Christine’s tips on posing in photos and helping everyone look good have helped her amass a vast following online. Over 166k people follow her on Instagram. Meanwhile, she has a whopping 1.3 million fans over on TikTok.
Her work has been featured in various news outlets and has helped plenty of people take better photos. As it turns out, even some minor changes to how you position your body can help you create an entirely different image. That, in turn, subtly alters what people think of you. Most of you Pandas would probably agree that it’s usually better to be seen as confident and capable, not timid and awkward.
Here's what some people thought of Christine's advice


#4 How To Get A Perfect Smile In Photos
You feel like your smile looks bad in photos? I'm gonna teach you how to get a perfect smile in photos every single time.
First of all, if you grew up in the United States like I did, you were probably taught to say cheese whenever the camera came out. But here's the thing, the movement that your mouth makes when you say the word cheese makes your smile go out instead of up, which makes it look awkward and strained instead of happy and natural. So I'm gonna teach you three different words that you can say instead of cheese to get a picture-perfect smile.
So the first word that you can use to get a picture-perfect smile is actually my personal favorite. I found it works best for me as well as most of the students that I coach. And that is saying the word money.
The second word you can say, instead of cheese is allegedly Oprah's favorite, and that's saying the word 'Yay'.
Finally, the third word you can try out is the word yoga.
So to figure out which word works best for you, I want you to record yourself saying them, and then when you play them back, I really want you to pay attention to the way that your mouth muscles move. When you say those words, once you decide which one you like the most, you can then practice it so that way the next time the camera comes out, you'll be ready with a perfect smile.
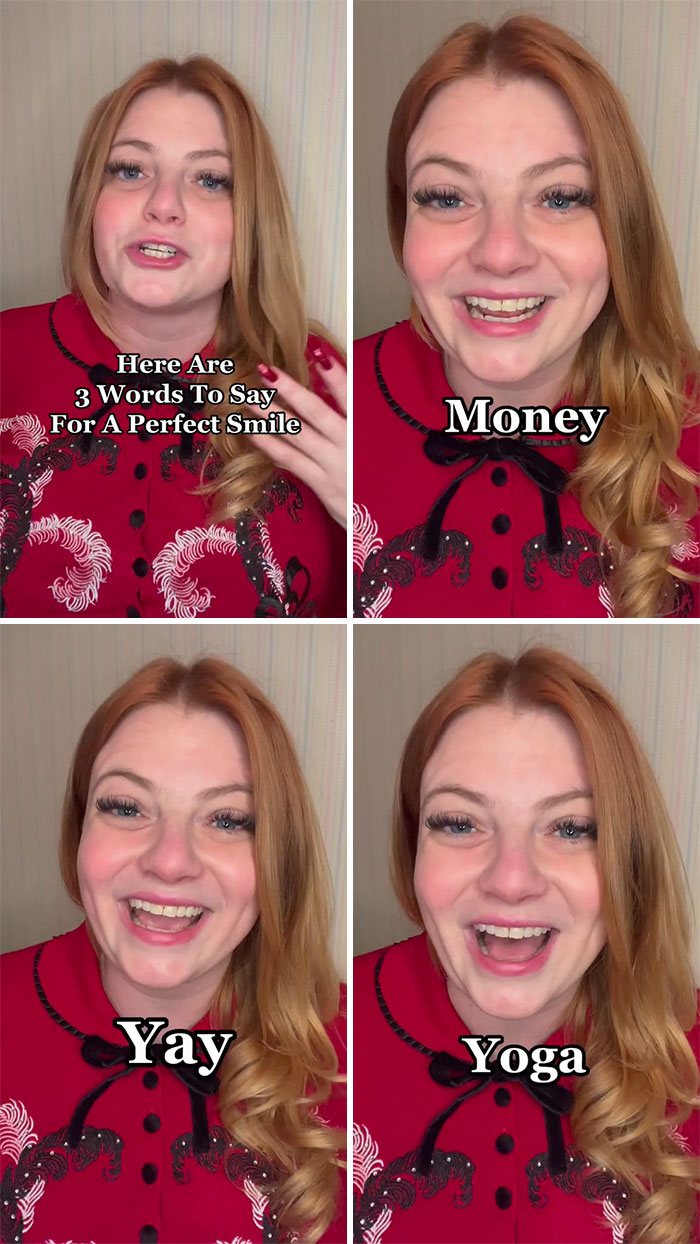
Image credits: lookgoodinphotos
Here's what some people thought of Christine's advice


#5 How To Fix An Awkward Mouth In Photos
If you feel like you look awkward because you have no idea what to do with your mouth in photos, this is for you. Because today I'm gonna teach you the number one mistake you're making that's making your mouth look weird and an easy hack that you can use to look better in photos instantly.
First of all, you need to stop holding the exact same facial expression. A lot of the time we have a default expression that we tend to do whenever the camera comes out. So we'll just hold that expression and the longer we hold our expression, the more tense our mouth muscles become and the more awkward our photo looks. So here's how to fix this.
Here's a secret hack that models have been doing for the past 50 years or so. Instead of just sticking with one facial expression, you are going to mouth the vowels a e, i, o, and u as you take your photos.
It may feel a little bit goofy, but try it out.
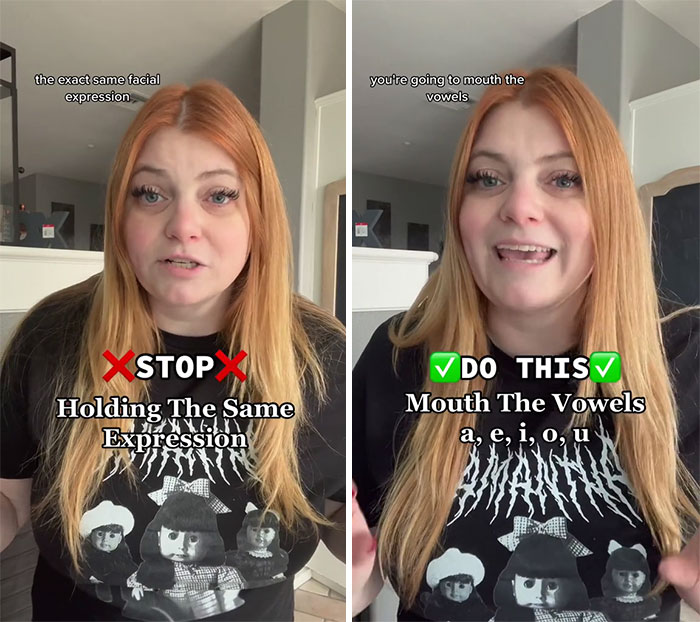
Image credits: lookgoodinphotos
Here's what some people thought of Christine's advice


#6 How To Get A Perfect Closed-Mouth Smile In Photos
I'm gonna teach you my three favorite tips for getting a perfect closed-mouth smile in photos every single time.
So the key to getting a perfect closed-mouth smile is making sure that the corners of your mouth are going up instead of out. So what I'm gonna teach you today is three different hacks that you can try that will get those muscles of your mouth to go up, which will make your closed-mouth smile look happy and natural.
Tip number one is a dentist's absolute worst nightmare. But it works before you smile. You want to clench your teeth down.
Tip number two - press your tongue against the roof of your mouth while you smile. I really can't show you guys what this looks like, but just trust me.
Tip number three. I read this in a magazine like a million years ago, but I guess this is what the Olsen twins do to get their perfect closed-mouth smile and that is: say the word 'prune' and then smile slightly.
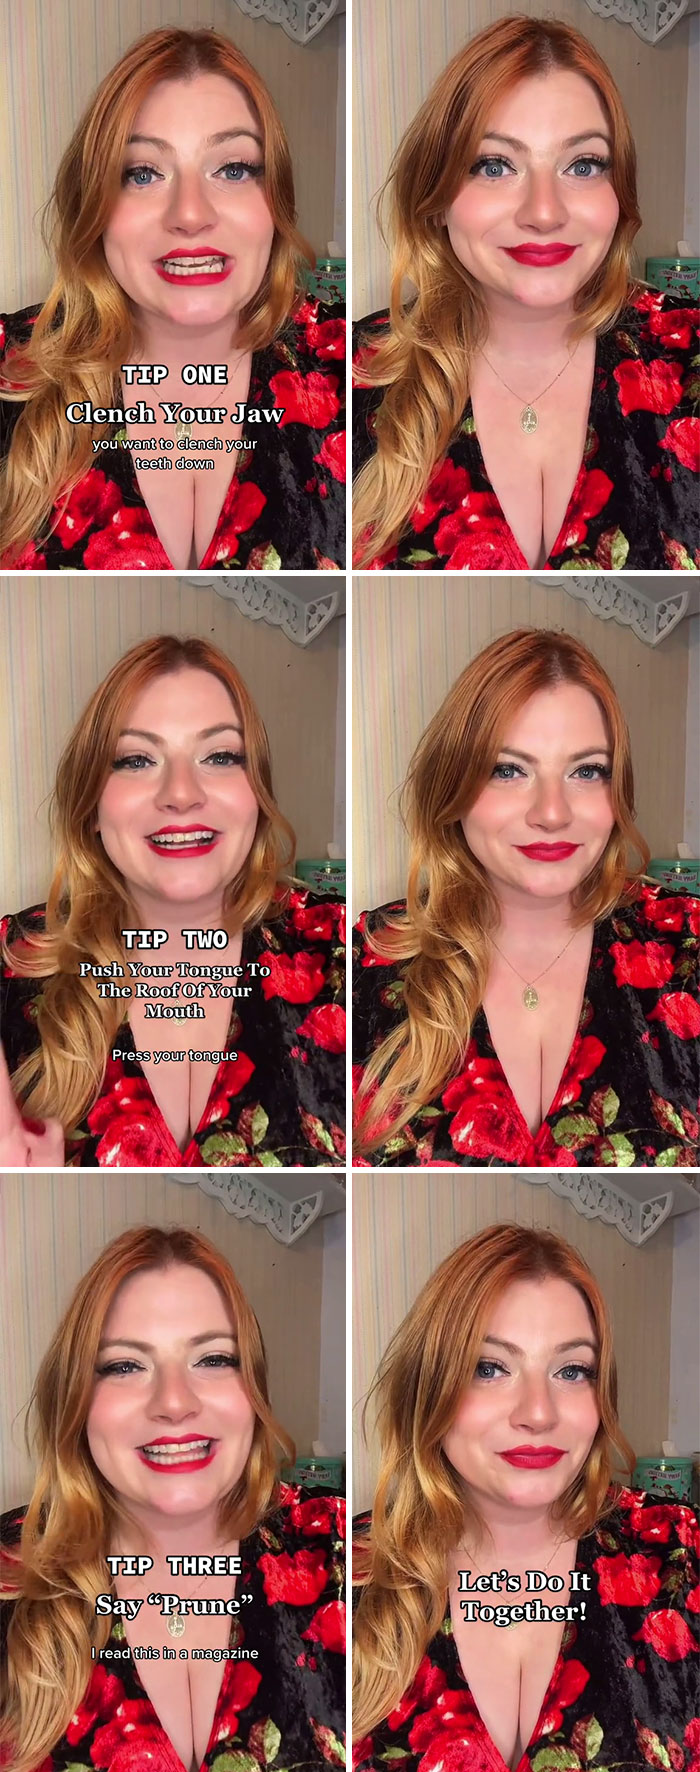
Image credits: lookgoodinphotos
It is completely natural to make immediate judgments about other people the moment we see them (or their photos). It’s not something that’s ‘bad,’ it’s simply a part of who we are. We make certain internal evaluations both consciously and unconsciously. How we express all of that, however, might vary from person to person.
Some people lead with kindness. Others might be very vocal with their criticism because they feel that by putting others down, they appear better in comparison. Whatever the case might be, the mature approach is to realize that many of our initial assumptions about someone can be entirely wrong. Without knowing someone’s story, we shouldn’t rely on instant judgments alone.
Here's what some people thought of Christine's advice


#7 How To Pose Your Face
This is for anyone who feels like their face looks awkward in pictures, but can't quite figure out why. Because today I'm gonna teach you my number one hack for instantly making your face look more photogenic.
So the reason why a lot of people don't like the way that their face looks in pictures is because they're not positioning their head properly for photos. Let me show you.
This is how my head is positioned naturally. And if we were just hanging out, having a normal and human conversation, this is what I'd look like. And while that's fine for a normal conversation, it doesn't necessarily translate really well in pictures because my shoulders look really broad, my head looks smaller, and my jawline looks softer and I kind of have a little bit of a double chin.
So here's what you need to do to fix it. Whenever a camera comes out, you need to push your forehead toward the camera lens. I'm just going to push that baby toward the camera lens. You can already see when I push my forehead toward the lens, my jaw end is much sharper and my head and my shoulders look much more proportional to one another.
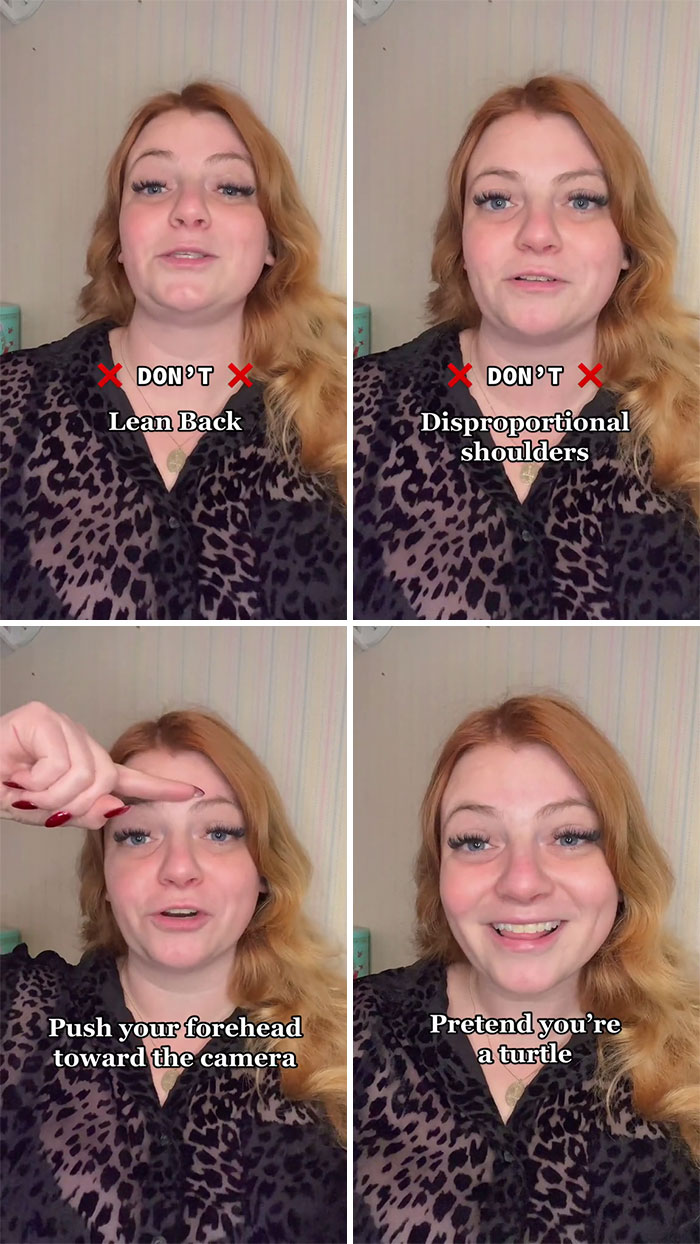
Image credits: lookgoodinphotos
Here's what some people thought of Christine's advice


#8 Why You Look Bigger In Photos And How To Fix It
This is for anyone who feels like they look way larger in photos than they do in real life. First of all, I wanna start off this video by saying you are not going crazy. This is actually a thing, and it is because of your back camera. I'm gonna teach you all why this happens and how to fix it.
So I'm going to teach you how to fix this problem by showing you an example. First thing, I have my photographer stand about two feet away from me and take a normal photo with the back. After that, she's gonna step back to five feet away from me and zoom in to 1.4 times and then take another photo of me so we can compare. So here's the two photos, and at first glance, you might not really see that big of a difference because it's my body. It's not your body, so you don't look at it every day.
However, I wanna zoom in on a few key differences between these two photos. First up, look at my face. My face looks way wider at 1x zoom, my eyes look farther apart and my nose looks a lot wider. Next, I think that this one's really the most visible. Look at how much wider my hands are at 1x zoom than 1.4x zoom. And finally, look at the difference between my belly shelf and my thigh. You can see that with the 1.4x, it's a lot smaller, a lot more clearly defined. With the 1x zoom, my thigh is like double the size of my thigh than in the 1.4x.
So why is this happening? Well, I don't wanna get too techy, but it's basically because all iPhones come with a wide-angle lens as their default camera. So they have the wide-angle lens and then the ultra-wide-angle lens. And when you're using a wide-angle lens, you're more likely to be subject to something called barrel distortion, which means whatever is in the center of your frame becomes curved and wider in your photo.
So the best way to fix this is by having what I had my photographer do in the second photo. Have them stand five feet away from you and zoom into 1.4x. Your features will look more natural and balanced. So there you go.
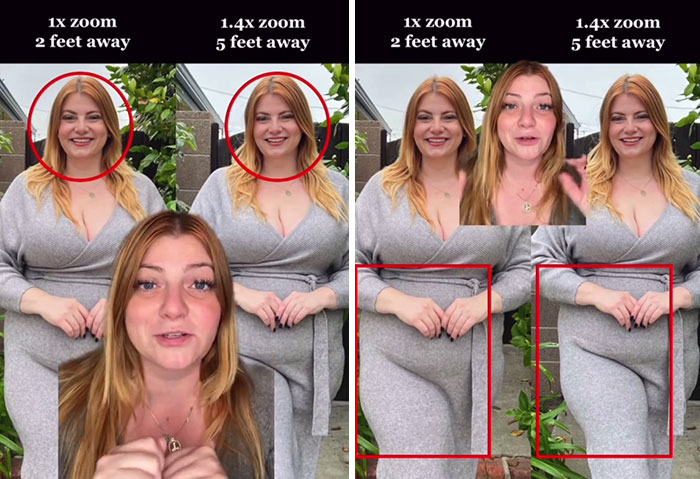
Image credits: lookgoodinphotos
Here's what some people thought of Christine's advice


#9 Posing Hack For Less Awkward Photos
If you look awkward in photos, it's probably because you're not posing your shoulders. Today, I'm gonna teach you all an easy way to do this so you can look more photogenic in pictures. So you can look your absolute best in front of the camera. Let's go.
If you're facing the camera straight on, there's a tendency for you to look a little bit stiff and bulky or a little bit wider, and you don't want that. So to break this up, all you're going to do is shift the placement of your shoulder so you can experiment. You wanna mess around and see what works for you because it makes your pose so much more dynamic. Let me show you the before and the after, so try it out.
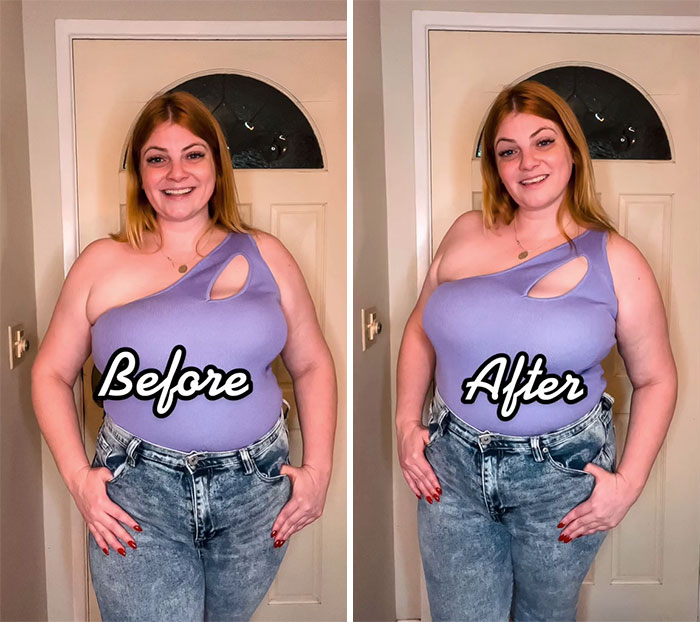
Image credits: lookgoodinphotos
Industrialization and how this led to more and more people moving to live in large, crowded, increasingly anonymous cities may have something to do with how much more important first appearances have become in modern life. Strangers, especially, are judged by how they look: how someone appears, within a mass of other people on the street, is often thought to be who they are as an individual.
So standing out becomes important in all aspects of your life. One way to do this is to craft an image of how you’d like others to perceive you, say, confident, easy-going, professional, serious, or a unique mix. Your body language, tone of voice, posture, and mannerisms all play an important role here.
Here's what some people thought of Christine's advice


#10 Why Your Face Looks Bad In Selfies And How To Fix It
This is for anyone who feels like their face looks really wide and really weird in selfies. If you've ever felt this way, no, you are not going crazy. This is actually a thing, and today I'm gonna teach you all why this happens and two things that you can do to fix it.
First, I'm gonna open up my camera app and take a normal forward-facing camera. Next, since the iPhone camera feature doesn't allow you to zoom in from the forward-facing camera, I'm going to open up an app called Lens Buddy, and I'm going to hold my phone arm width away from me, and then I'm going to zoom into 1.4x using the app and take another selfie.
So this is a normal selfie using a forward-facing camera, and this is my selfie when I kept the phone at about an arm's distance away from me. And I use the Lens Buddy app so I could zoom in 1.4x on my face.
The difference between the two photos really speaks for itself. My eyes look farther apart. You can see there's a bigger space between my eyebrows. My nose looks larger and my face overall looks bigger when I do it on standard forward-facing camera mode. This is a lot better, in my opinion, personally. So why does this happen? Just like your back camera, your phone's front camera is probably using a wide-angle lens as its default lens. So I have the iPhone 13 Pro and mine has two lenses on the front. One is a wide-angle lens and one is an ultra-wide-angle lens, which means there's no normal standard lens. So whenever you're using a wide-angle lens, there's a chance that you'll end up with something called barrel compression in your photo. And that's because your phone sensor actually gathers everything that's within that wide-angle frame, which is more than what you see when you're taking a selfie. And then it tries to compress all of that information into the little 4x3 standard photo. So you end up looking way blown out of proportion in your photo because it can't really process all that information within the 4x3 frame.
So there are two ways to fix this. The first is by holding the camera farther away from you. When you're taking a selfie, aim to go at least a full arm's length distance away from your face. The second is by using an external app like Lens Buddy, or Snapchat, or Instagram stories to zoom in to make your face look more normal. So there you have it.
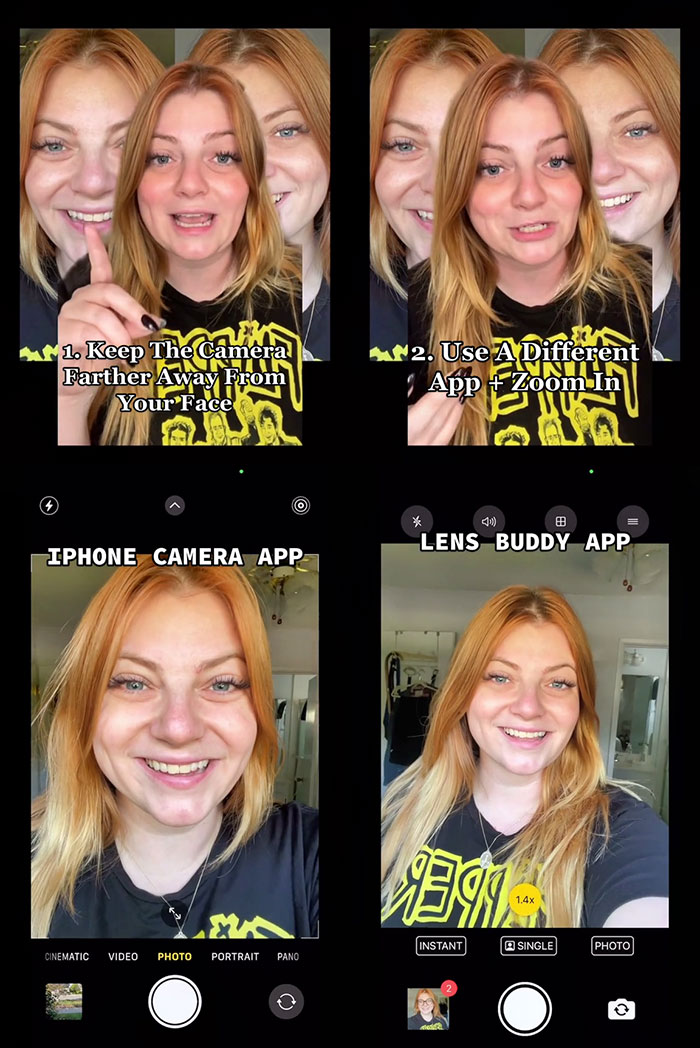
Image credits: lookgoodinphotos
Here's what some people thought of Christine's advice


#11 Do Your Eyes Get Small When You Smile For Your Photos?
This is for anyone who feels insecure about their eyes getting really small when they smile for photos. I'm gonna teach you three easy hacks you can do that will keep your eyes open whenever you smile for photos.
Tip number one: when you're smiling for a photo, instead of looking directly at the camera, I want you to first look up and then look directly at whatever you're looking at.
Tip number two: have your photographer count to three. On one, you're gonna look at your photographer smiling. Two, you're going to look down but keep your smile. And at three, you're going to look back up at your photographer.
Finally, tip number three, and this is actually something that I do every single time I smile. I've kind of retrained my mouth to do this because I am a very happy person who likes to smile really, really big, and that is to create space between your teeth when you smile. You're just gonna drop your jaw a little bit and create a little bit of space.
All these steps aside though, I want you to remember one thing. No matter how you smile, your smile is beautiful because in that moment you're expressing happiness and there's literally nothing more wonderful than that. Posing is a fun tool that allows you to express yourself in different ways, but at the end of the day, however you choose to smile is your signature, and you need to own that with confidence.
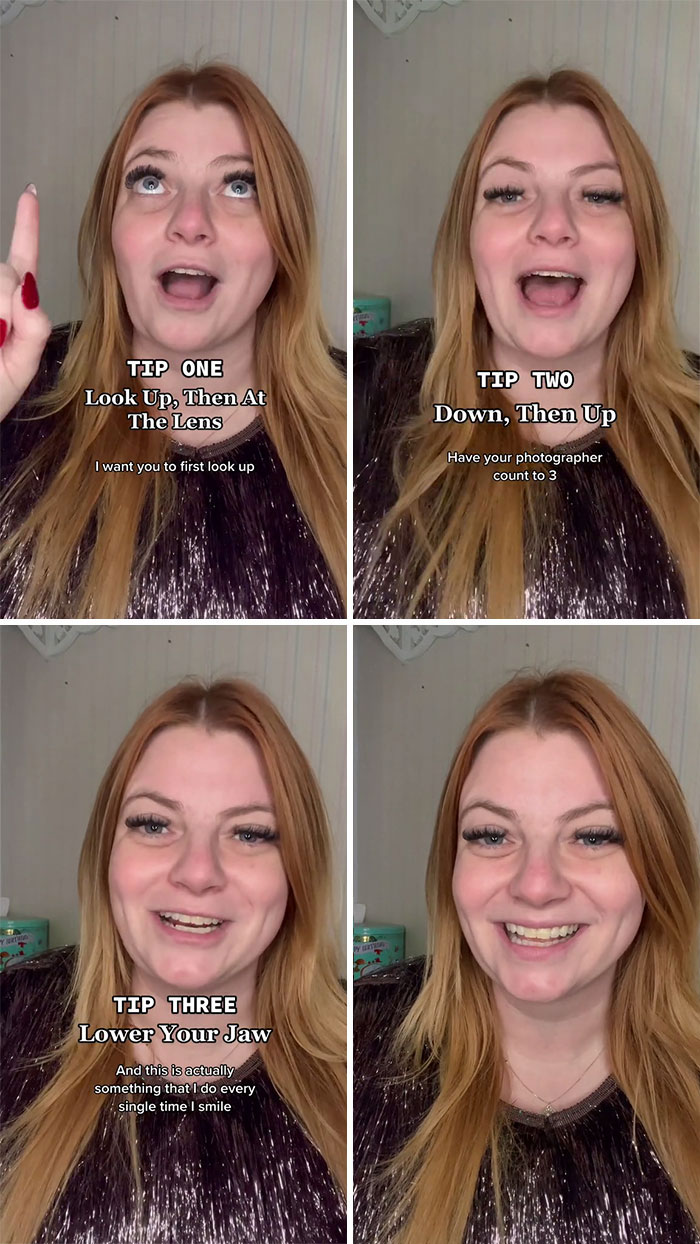
Image credits: lookgoodinphotos
Here's what some people thought of Christine's advice


#12 Insecure In Sitting Photos?
If you feel insecure about the way that your body looks whenever you take sitting photos, I want you to listen up because today I'm gonna teach you the easiest hack.
A lot of the time when we sit down, we lean against the back of the chair or the couch or whatever it is we're sitting on. And the thing is, while this may be comfortable and there's absolutely nothing wrong with sitting this way in real life, I mean I do it all the time, it doesn't really translate that well in photos. As you can see, my torso has virtually disappeared and my midsection is super compressed, which makes it look even wider than it is.
Also, there's a lot of pressure on my legs and thighs, which is making them look wider. And overall, my body looks really box-like, you can't really see any of the definition of my body.
So here's the easiest way to fix this. The easiest hack to instantly look better in sitting photos is to move to the edge of your seat. Instead of sitting back in the chair, you're basically going to balance on the edge. From there, you can elongate your legs or bend them to create triangles and strike a pose with your arms.
So as you can see, my pose is virtually the same in both photos. The only thing I really changed is that in this photo, I'm sitting at the edge of my seat and I'm holding my torso up. I'm engaging my core and holding myself up.
I think that there's a misconception, especially with those of us who are larger, that we want to hide from the camera and bulk up and make ourselves smaller. When in actuality, that ends up making us look larger than it does when we show our bodies off.
And a good rule of thumb when you're posing for photos is to always elongate your limbs and engage your core.
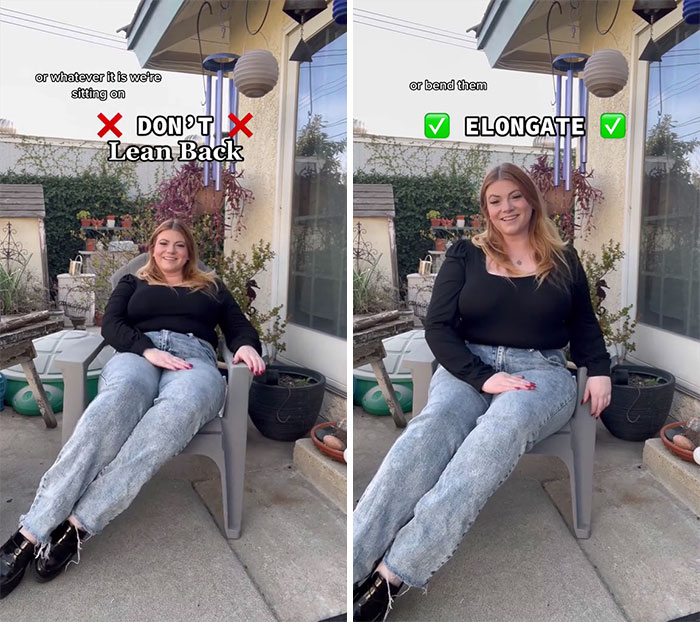
Image credits: lookgoodinphotos
You might be incredibly skilled and capable and fun in real-life, but if you carry yourself in a timid way or have an overly goofy photo, others might see you as someone you’re not. It might not be a bad idea to sit down and consider what others think of you, how you present yourself to the world, and what, ideally, you’d like to change.
Even a small shift, like taking a good profile photo or upping the quality of your selfies can help you curate your online persona. Though, keep in mind not to lose track of what’s really important here—the relationships you cultivate, not the likes and comments you get under your brilliant new pics.
Here's what some people thought of Christine's advice


#13 How To Pose For Smaller Arms
I'm gonna share with you all my four foolproof ways to minimize the appearance of larger arms and photos.
Tip number one, keep your arms away from your body. You can see I'm a bigger girl, so there's a lot to work with. The fat kind of squishes out. When I move it away, it becomes smaller.
Tip number two, stand at a 45 degree angle and roll your shoulders back. When I go 45 degrees and I roll my shoulders back, there's a big difference.
Tip number three is the most obvious, but you need to bend your arms. So there's multiple ways to do this. A lot of people go for the teapot pose, but you can also do kind of flipping the teapot, pushing it back; zipping your hands up your legs. You can do this pose right here, which is kind of like the raptor, but you're holding onto your hand, but you're creating space between your arms and your natural waist to give the illusion of smaller arms.
Finally, number four, whatever's closest to the camera looks largest, and whatever is farthest away looks smallest. So if you want your arms to look smaller in photos, you need to get them away from the camera. I'm gonna show you an easy pose to do this. So you're gonna start off at the 45 degree angle with your shoulders rolled back. Then you're gonna kind of zip your arms up. You're going to hide one arm behind, that arm doesn't exist. Then you're gonna take this other arm and instead of going to the side like, you're gonna send it back. See this versus that? My arms look a lot smaller.
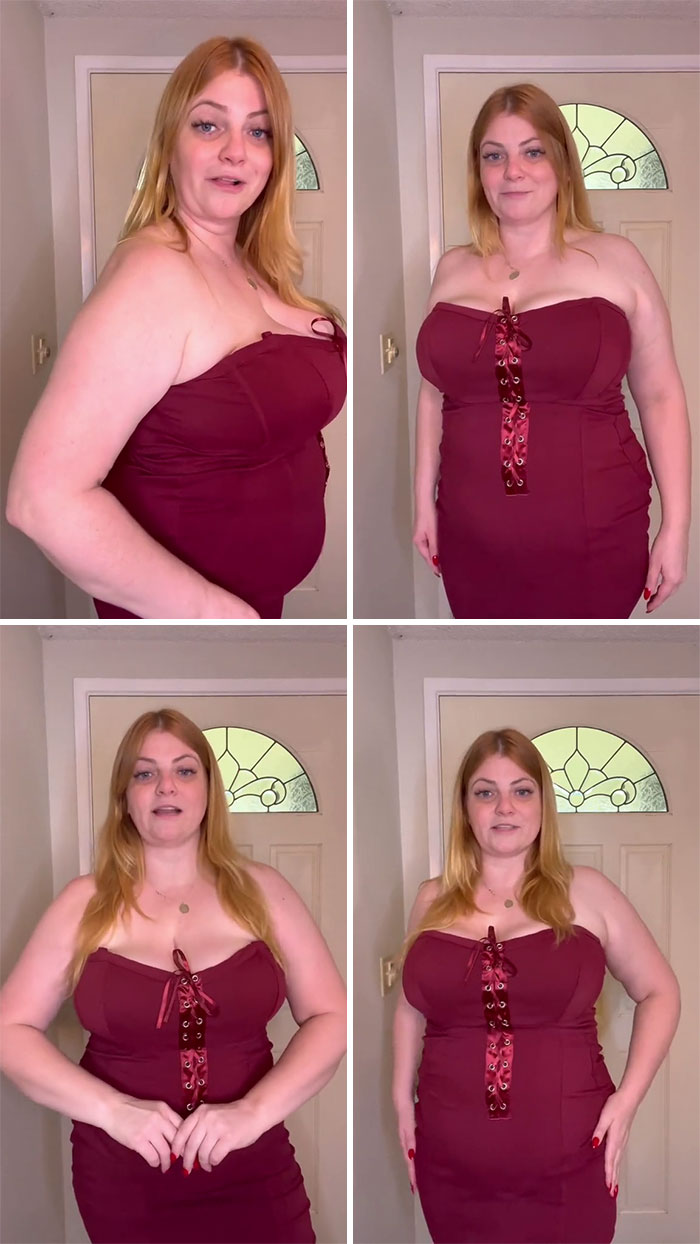
Image credits: lookgoodinphotos
Here's what some people thought of Christine's advice


#14 How To Fix Your Posture
There's a good chance that your posture is the number one thing that's ruining your photos. So today, I'm gonna teach you an easy hack to get the perfect posture.
So to get perfect picture posture, you want to pretend that a string is pulling you up from your head, but you don't wanna just feel it within your shoulders and your head. You really want to feel it from the base of your body all the way through. I feel my legs are engaged, they are firmly planted on the ground, and I pull up through my hips. You see? What a difference!
When I pull my hips up, I personally like to move my hips back a little bit, but you want to keep your hips engaged. Then you really want to feel your abdominal core holding your pose together.
Finally, be sure to lift your chest. It can be easy, especially if you're like me and you have a larger chest, to kind of let it hang. Hold it up, push your shoulders back, and then head like this. Let's take one more. Look, here I am standing with bad posture and here's the after where I'm standing up straight.
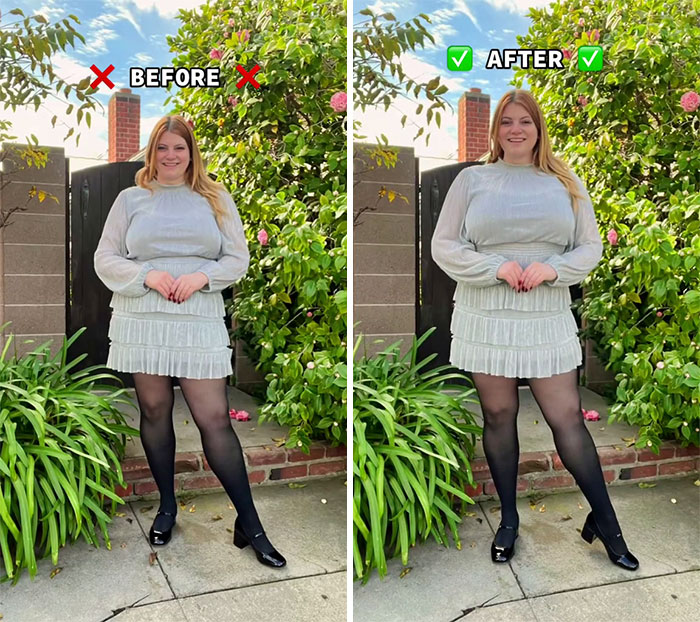
Image credits: lookgoodinphotos
Here's what some people thought of Christine's advice


#15 Why You Look Bad In Full Body Photos And How To Fix It
This is for anyone who feels like they look really weird in full-body photos. Today I'm gonna show you why this happens and I'm gonna teach you the most flattering camera angle that you can use to get photos of yourself that you actually like.
First, I'm gonna have my photographer take three photos from three different angles. One from a camera angle above my head, the second from a lower camera angle around knee height. And the third from a neutral camera angle about chest height. Here's all three. And as you can see, the proportions of my body look vastly different depending on the camera angle.
So a lot of people, women especially, will take photos from a higher camera angle because they like the way that it minimizes the appearance of their double chin. And while it does do this, it also gives the illusion of broader shoulders and a shorter, more compact torso in legs. So basically it makes you look shorter and wider.
By the same token, taking photos from a lower camera angle can make your legs and your torso look longer. But if you tend to carry weight in your thighs or lower belly, that can look larger from this angle. This is because whatever's closest to the camera looks largest, and whatever is furthest away looks smallest. And in this case, your hips and your thighs are what is the closest to the camera lens.
And if you want your photos to look closest to how you look in real life, I recommend having your photographer hold the camera anywhere between your belly button and your chest.
But as always, with taking photos, there is no one size fits all. The key to taking photos is knowing your body and knowing your goals. You have to know what you wanna maximize and what you want to minimize about your body, and then move your camera accordingly. But if you're a beginner who just wants your body's proportions to look as close to real life as possible, it's safe to have your photographer put the camera lens somewhere between your belly button and your chest.
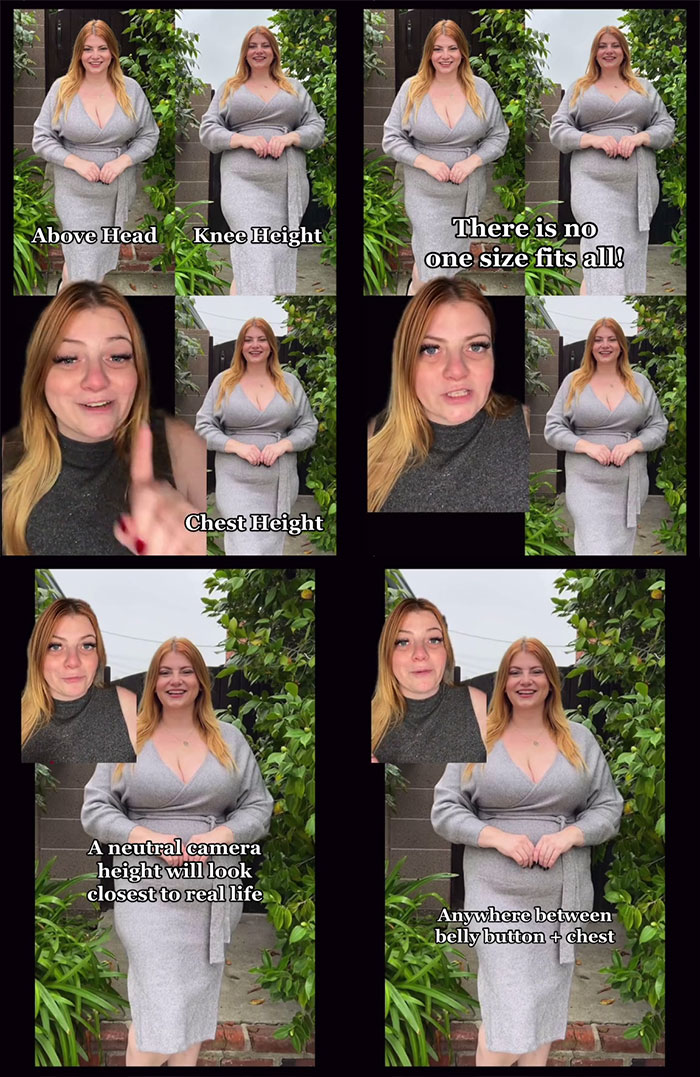
Image credits: lookgoodinphotos
What did you think of Christine’s tips for looking more photogenic, dear Pandas? Which of her pieces of advice was the most useful for you personally? What do you do to feel more confident and relaxed when someone’s trying to take your picture? Feel free to share your thoughts and tricks in the comments.
Here's what some people thought of Christine's advice


#16 Easy Hack To Look More Photogenic
If you feel like you're awkward in front of the camera, here's the easiest thing you can do to instantly look more photogenic. This is the one thing I want you to remember.
If you're taking pictures and you have no idea what to do, because it will infinitely make you look better and make you look like you know what you're doing, you need to put your weight on your back leg.
Let me show you, for instance, this is what I look like with my weight evenly distributed between both. And this is what it looks like when I step back with one leg. I can keep my foot flat, I can point it or I can bend it from there. But the key thing is that standing with my weight on both legs makes me look flat, bulkier, boxier. And when I break it up, it instantly becomes more visually appealing and my body looks longer.
So there you have it. It's minimal effort, but it gives a really great result and it's really simple to do. So try it out. Let me know what you think.
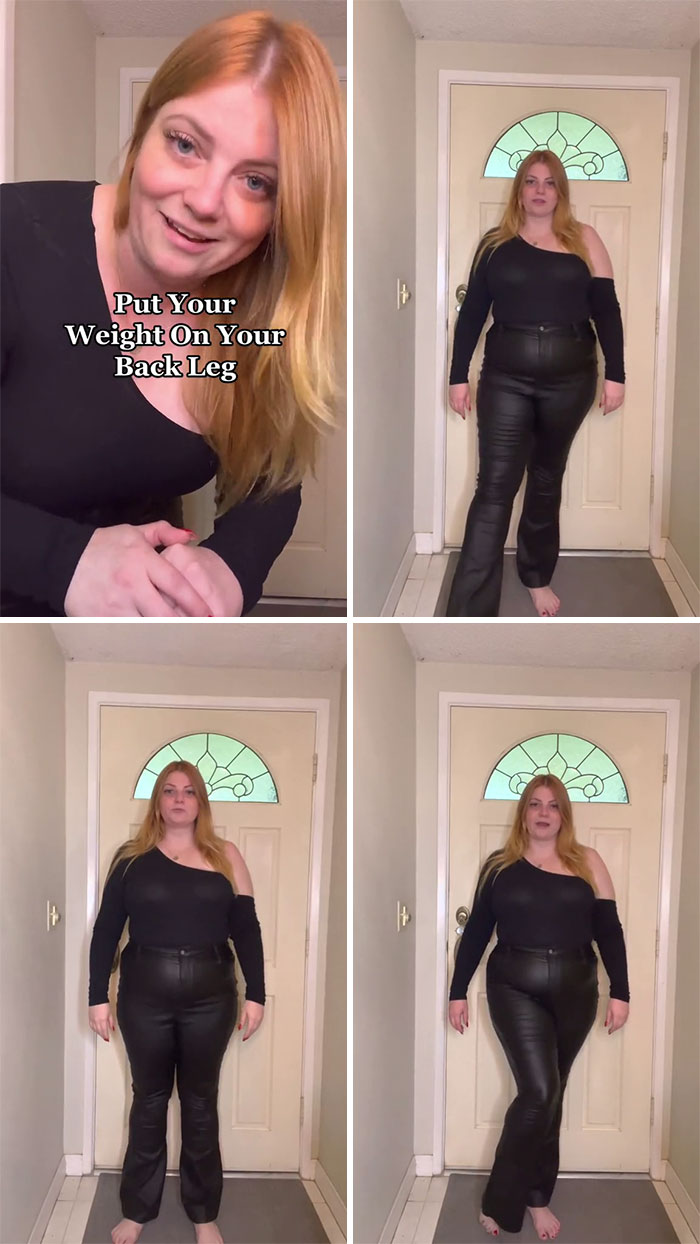
Image credits: lookgoodinphotos
Here's what some people thought of Christine's advice


#17 Why Are You Always Squinting In Photos And How To Fix It
This is for anyone who feels like their eyes are always closed in pictures. I'm gonna teach y'all why this happens and two things you can do to fix it.
First, let's talk about why this is happening. If your eyes are always closed in photos, there's a good chance that your eyes are bracing for light, whether that's through natural light, you're taking photos during midday and there's a bunch of sunlight, or because you're taking photos with flash so your eyes are squinting and bracing for that light to hit them.
So here are two tips to help you fix it for the next time you take photos. Tip number one: So you're gonna have your photographer count to three. You're gonna have your eyes open on one, you're gonna blink them on two, and you're gonna open them back up on three. This tip works really well for a lot of people, but if it doesn't work for you, you can always try tip number two, which works especially if you're taking photos with a flash.
So for tip number two, what you're going to do is instead of looking at the camera lens, you are gonna look at your photographer's forehead. So you're gonna look a little bit higher than the camera lens and the flash. This will make your eyes bigger, so if you do squint, it won't be as noticeable. And also the flash won't get in your eyes as much and you won't get red eyes in your photos. Also, psychologically, it's a lot less intimidating for people to look at another person than it is to look at a camera, so it just kind of works out a little bit better. So try it out.
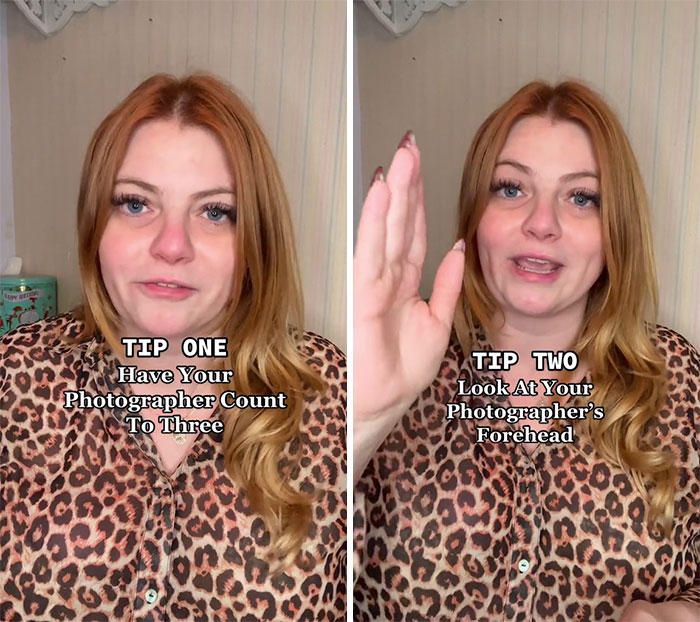
Image credits: lookgoodinphotos
Here's what some people thought of Christine's advice


#18 How To Pose So Your Eyes Look More Alive In Photos
If you're someone who feels like your eyes look crazy in photos, whether you get completely dead eyes or you get a deer-in-the-headlights expression, I want you to listen up because today I'm gonna teach you the easiest way to get a perfect smize in photos every single time. And in case for some reason you don't know what smize means, it's a term that Tyra Banks came up with in the early 2000s. That means smile with your eyes. Basically, it's the thing that makes your smile look happy instead of creepy.
First of all, getting the perfect smize is challenging and is going to take a lot of practice because everyone's face is different and controlling the muscles on your face is a really hard thing to learn how to do. You're going to have to try it a couple of times before you get the hang of it.
So I know that this is gonna sound a little bit crazy, but I found that the key to getting the perfect smize is to pretend that you're at the grocery store, scanning an aisle for the kind of cereal that you want. So you know you're looking through the aisle, you're trying to find the cereal that you want. You're not looking like you forgot your contact lenses or your readers at home. But instead, you're just kind of focusing. You're looking with great intensity.
So then if you're finding that your eyes look too intense or they're too closed, you can focus, look up, then look directly at your subject. And that's gonna give you that same kind of warmth and smize without having your eyes closed.
I know that this is a little bit of an abstract lesson, and I'm not an oculist, a kinesiologist or a physiologist, so it's a little bit challenging to describe the motions that go on within the muscles that surround the eye.
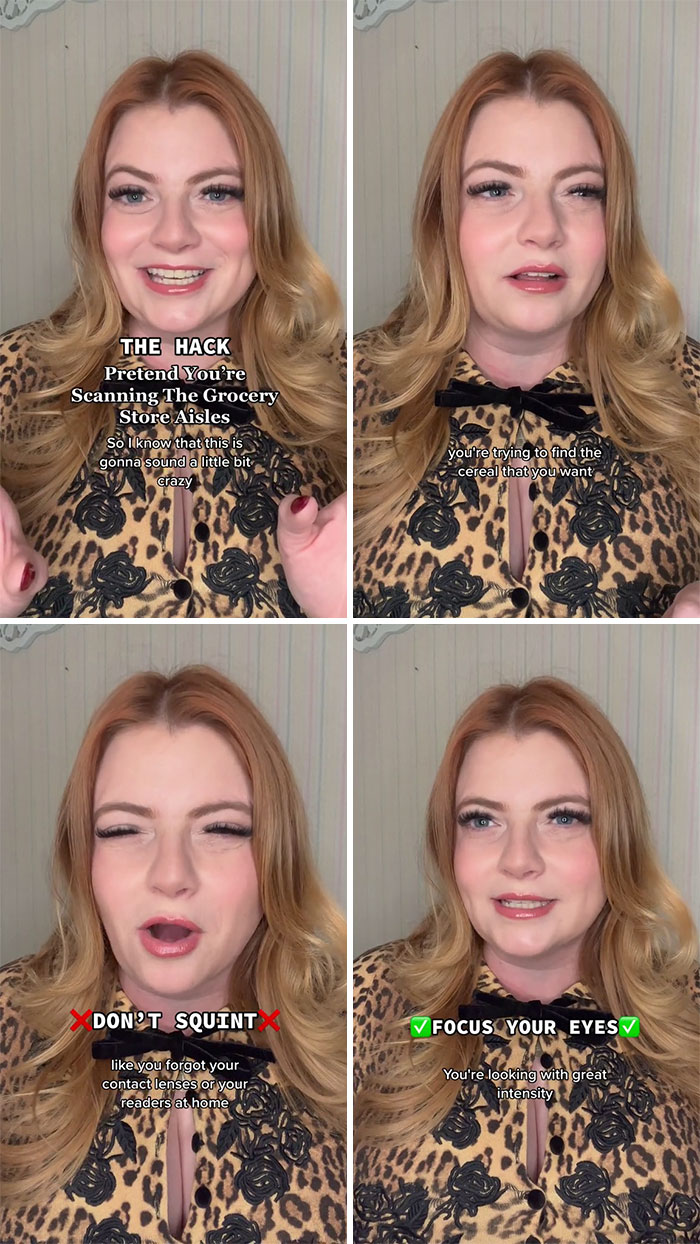
Image credits: lookgoodinphotos
Here's what some people thought of Christine's advice


#19 Why One Eye Is Smaller In Photos And How To Fix It
If you're someone who feels like one eye is significantly smaller than the other whenever you smile for photos, I want you to listen up. First of all, you're not alone. This is something that's really common. All of us have different levels of asymmetry in our faces, and we tend to notice it more when we smile for photos. So today I'm gonna teach you the three common reasons why this happens and what you can do to make it less visible.
So the first reason why one of your eyes could be smaller in photos is actually the most common, and that's because of the muscles that are stronger on that side, and for a lot of us, this tends to be our dominant eye. Think of when you're lying in bed, reading something in the dark you'll close one eye and look with the other eye. The eye that you're looking with tends to be the one that's stronger for most people.
The second reason why this happens is due to ptosis or drooping of the eyelid. Many of us don't realize that one of our eyelids slightly droops more than the other one until we take photos. And this becomes really apparent when we're smiling and one eye becomes more engaged than the other.
Finally, the third reason is because of lens compression. Our phone's cameras are absolutely terrible.
So let's go back to reasons one and two, and I'm gonna teach you how to make it less visible in photography. Whatever's closest to the camera looks largest, and whatever is farthest away look smallest. To trick the viewer into thinking that your smaller eye is larger, you are going to angle your face toward the camera with the smallest eye closest to the lens.
And the truth of all of this is that nobody is really as focused on your eye size as you are. Most people just see you, they see a beautiful photo and then they move on. So really don't stress out about it too much. Just enjoy taking the photo and have fun.
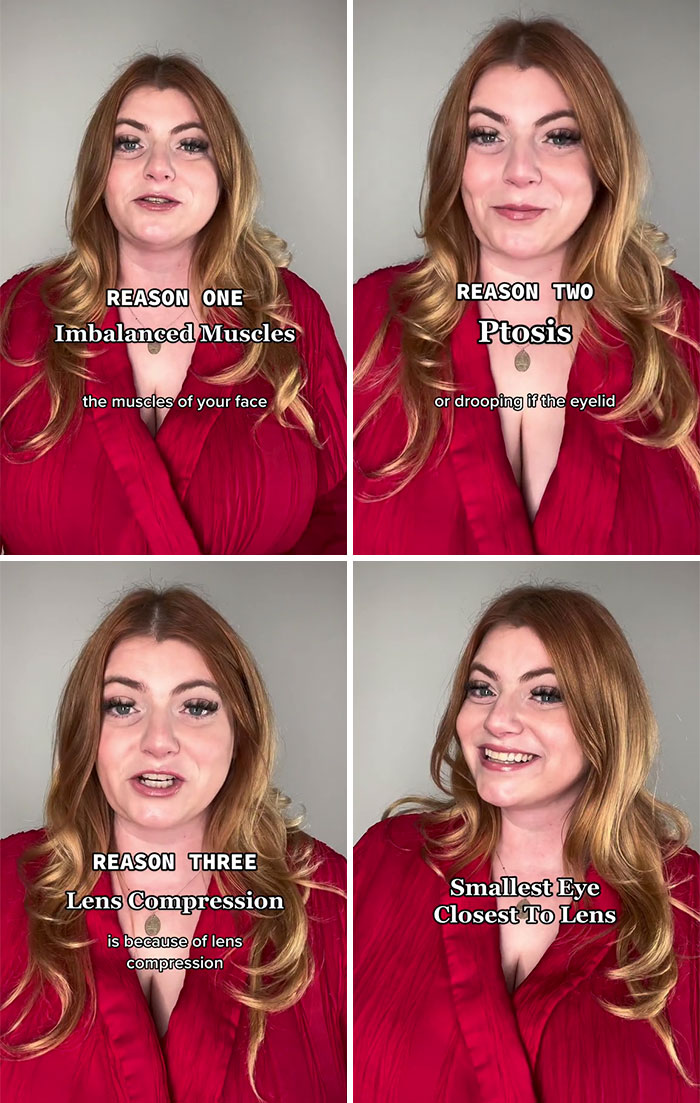
Image credits: lookgoodinphotos
Here's what some people thought of Christine's advice


#20 What Do I Do With My Hands In Photos?
If you feel like you're super awkward and have no idea what to do with your hands, whenever you take photos, this is for you. Today, I'm gonna teach you one easy hack so you'll always know what to do with your hands whenever the camera comes out.
When it comes to posing your hands for photos, everybody and their mother is going to be talking about creating triangles. Basically create triangles within your pose. And while this is really great for adding visual interest to your pose, it can look a little stiff horse and boring.
So here's the trick to posing your hands to make your photos look more natural. Always give your hands something to do. The first way to do this is by evaluating your outfit. What can my hands do with my outfit? I can put one hand in my pocket. I can put my fingers through my belt loop. I can adjust my collar either with one hand or using both hands. I could pull my pants up if I wanted, so put my hands here. Since I have long hair, I can adjust my hair. If I had a watch, I could adjust my watch. I could be playing with the cuff of my shirt or adjusting my cuff links. So essentially the first thing you need to do is evaluate your outfit and see how your hands can play with whatever it is you're wearing.
The next thing you can do is think about incorporating props. For instance, I can pose with a drink in my hand. Or I can incorporate my bag and pose by holding it in front of me, swinging it back and forth, or even wearing it. And if you have sunglasses, you can put them on your head and hold them. You can hold them with one hand or you can adjust them on your face. The options are really endless, but the secret is giving your hands something to do so you look more natural.
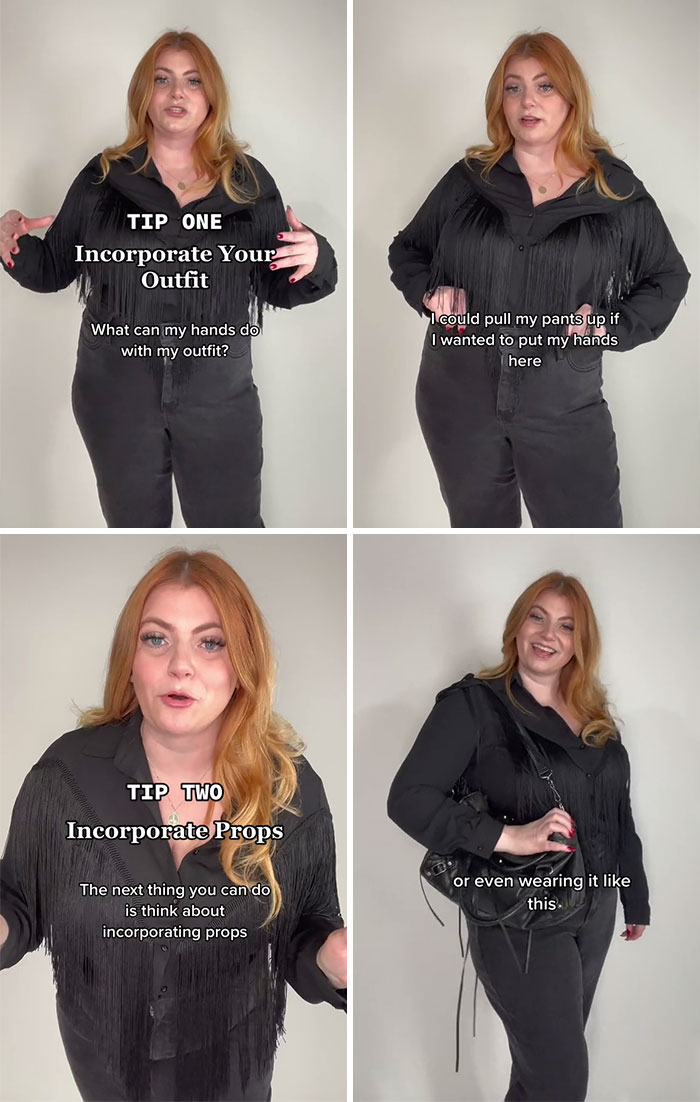
Image credits: lookgoodinphotos
Here's what some people thought of Christine's advice


No comments